Beginning Astrophotography | Part 2 - Connecting Your Equipment
Learn the basics of choosing the right beginner equipment to get out start capturing the stars
Mike Hayes
Astro Hayes
28 Jun 2020
4 min read
Beginning Astrophotography | Part 2 - Connecting Your Equipment
Part 2 explains how to connect your equipment to a computer and which software you'll typically use. If you already bought gear in Part 1, this guide will walk you through the software stack and the basic drivers you need to get started.
What software do I need?
Your exact setup depends on your hardware and operating system, but the common building blocks are:
- ASCOM / drivers (for Windows)
- An image acquisition program (captures sequences/frames)
- A guiding program (for long exposure tracking)
- A planetarium program (optional — for PC-controlled slewing)
The planetarium program is optional if you plan to control your mount only via its hand controller. Later guides will cover how to decide whether to connect the mount to your PC.
ASCOM and drivers
ASCOM (Astronomy Common Object Model) is a Windows platform that provides drivers allowing cameras, mounts, focusers, and other devices to communicate with astrophotography software. If you're on Windows, install the latest ASCOM Platform first:
- ASCOM Platform: https://www.ascom-standards.org/Downloads/Index.htm
After installing ASCOM, install the specific drivers for your mount and (if applicable) your CCD camera. DSLRs often work over a standard USB cable without an ASCOM driver, but dedicated astronomy cameras usually require one.
Useful driver pages:
- Camera & Video Drivers: https://www.ascom-standards.org/Downloads/CameraDrivers.htm
- Mounts: https://www.ascom-standards.org/Downloads/ScopeDrivers.htm
- Focusers: https://www.ascom-standards.org/Downloads/FocuserDrivers.htm
- Filter Wheels: https://www.ascom-standards.org/Downloads/FilterWheelDrivers.htm
If you can't find an official driver for your device, search the manufacturer's site and community forums — many third-party drivers exist.
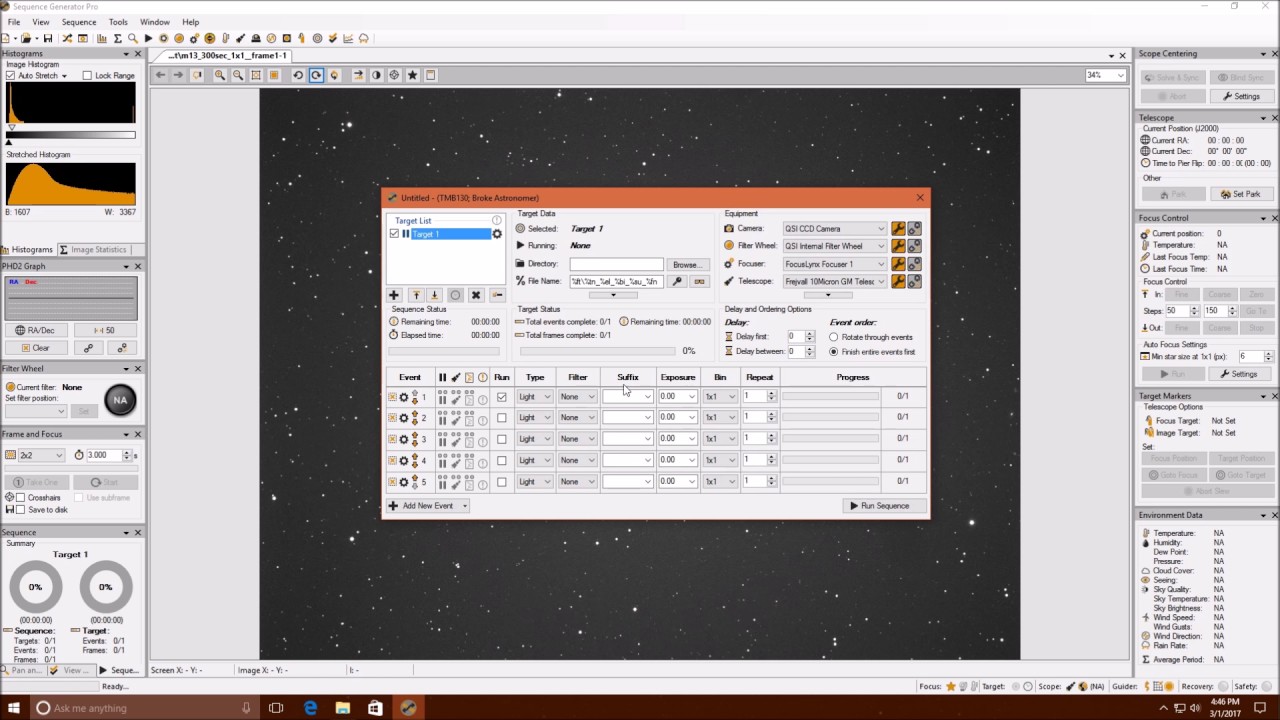
Choosing an image acquisition program
An acquisition program controls exposures, filters, and image sequencing. If you're starting with a DSLR you could use a simple shutter release, but using an acquisition program now will make future upgrades (to dedicated cameras and multi-night sequences) much easier.
Recommended options:
- Backyard EOS — Free but for Canon DSLRs only: https://www.otelescope.com/files/
- Astro Photography Tool (APT) — Free and very capable: https://www.astrophotography.app/
- Sequence Generator Pro (SGP) — Paid ($99) with powerful automation and platesolving: https://www.mainsequencesoftware.com/Products/SGPro
- KStars / Ekos — Cross-platform (Linux, Windows, macOS), free
Notes:
- APT is an excellent free starting point and will cover most use cases. When you need advanced automation (multi-filter sequences, platesolving, repeatable sequences across nights), SGP is a popular paid option.
- If you use a Mac or Linux, consider KStars/Ekos for a full suite of tools.
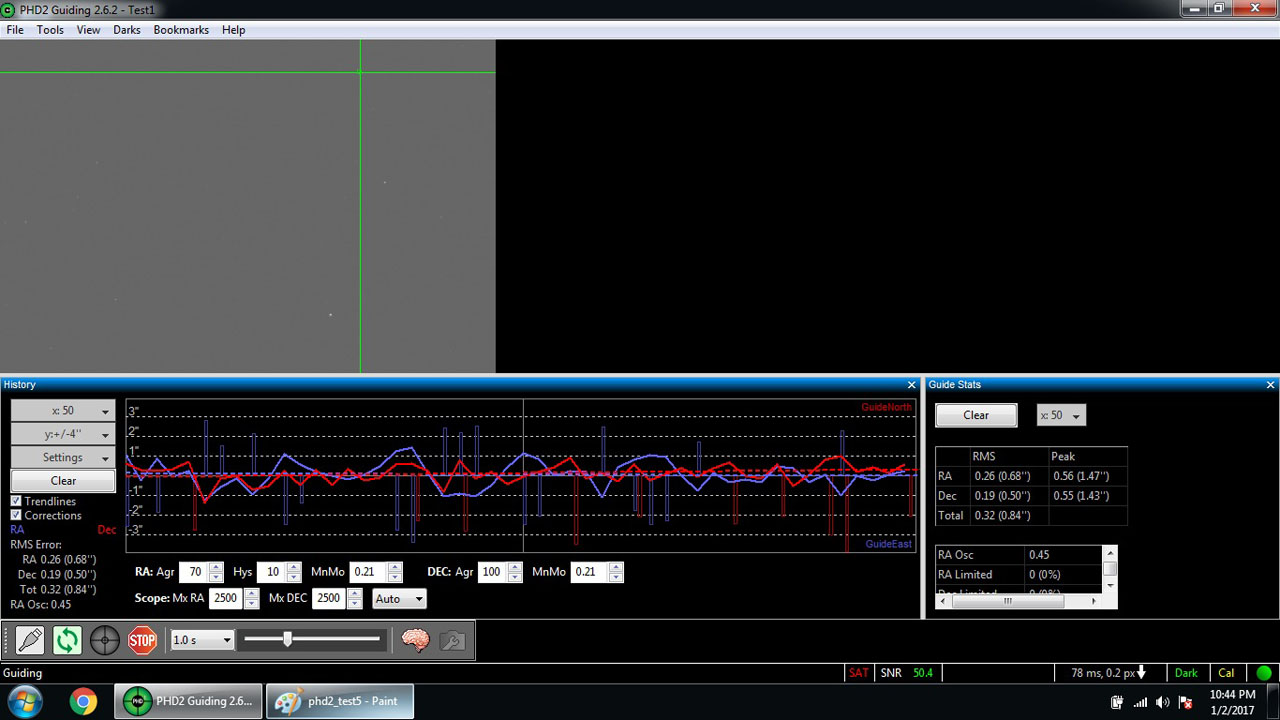
Guiding (PHD2)
PHD2 Guiding is the most common starter guiding program. With a guide camera and PHD2 you can continuously correct tracking errors in real time.
How it works (high level):
- A guide camera takes short exposures of a nearby guide star.
- PHD2 measures the star's movement and sends correction commands to the mount.
- The program shows a graph of the tracking error and statistics such as RMS error (arcseconds). Lower numbers are better — high guiding error usually means polar alignment or mount tuning is required.
I'll cover polar alignment and step-by-step use of these programs in Part 3.
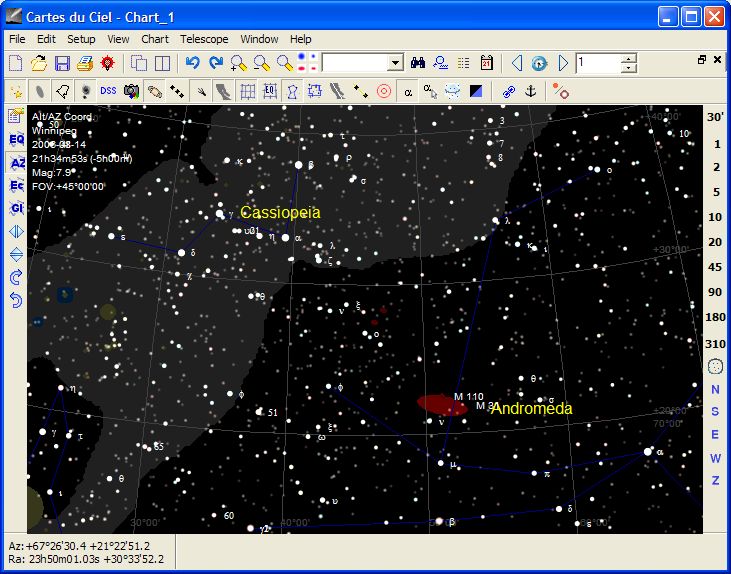
Planetarium / mount control
Connecting your mount directly to a PC lets you use a planetarium program to slew to targets by clicking the sky map.
- Some mounts can be connected directly via a USB cable. Others require a connection through the handset or a special adapter (check your mount's manual).
- A popular free planetarium program is Cartes du Ciel (SkyChart): https://www.ap-i.net/skychart/en/start
Benefits of PC control:
- Click-to-slew to a chosen target from a star map
- Integrate plate solving, acquisition, and sequencing into one workflow
- Easier logging and repeatable automated sessions
Final thoughts and next steps
This part focused on what software and drivers you'll typically need. Action items before Part 3:
- Install the ASCOM Platform (Windows) and the appropriate drivers for your mount/camera.
- Try a free acquisition program (APT) to learn capture workflows.
- Install PHD2 and practice guiding on short exposures.
- If you plan to control your mount from a PC, install a planetarium program (Cartes du Ciel or KStars).
Part 3 will walk through polar alignment, connecting the software together, and a hands-on session configuring each program.
Clear skies,
Mike Hayes — 2020-06-28
On this page